More how-tos
how-tos
Use and Understand Radio Telemetry - the Basics
The Three Components of VHF Radio Telemetry
Animal radio tracking systems consist of three primary components:
- 1) The transmitter(s), affixed to the research species
- 2) The radio receiver, or receiver-datalogger
- 3) The antenna system and associated cabling
The fundamentals of manual radio telemetry apply to other tracking systems, such as unattended fixed stations, and aerial tracking. All three of the system's components must work together in order to successfully conduct radio tracking. Keep this in mind if you ever need to troubleshoot.
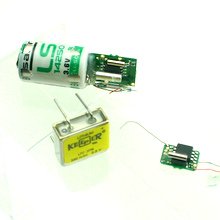
The Transmitter
Consists of four components:
- 1) a power source (battery)
- 2) electronics package (circuit board and frequency crystal oscillator)
- 3) antenna, and
- 4) attachment method
Consider the transmitter weight and operating life. These variables are mainly a function of the battery type and its size. The larger the battery, the longer the transmitter life, and the heavier the transmitter. Battery size has little effect on transmitter range, only life.
The transmitter's antenna can be either internal or external to the encapsulated transmitter electronics package. An internal antenna may be a coil or loop type. Models using internal antennas are used in applications where an external antenna would adversly affect the studyanimal. Transmitter range may be decreased by up to 50% compared to a transmitter with an external antenna.
For most transmitters, external dipole antennas are employed. Various kinds of materials in different weights, from stainless steel thread, to single and stranded steel, are used. Some applications might require a more rigid cable, others a flexible antenna. The dipole antenna consists of a single piece of material that is typically six to twelve inches long, and which protrudes from the electonics package.
Transmitter attachment methods may be collars, necklaces, ear tags, etc., depending on the species being studied.
Each radio transmitter is custom built to your specifications. The specific frequency requested, attachment method, and the battery life the study requires, are all variables which affect the design and assembly of transmitters. Keep this in mind when ordering transmitters.
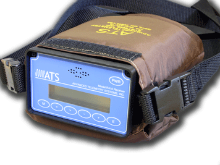
The Receiver
A tracking receiver designed for radio telemetry should be used to pick up the transmitter’s signal. An antenna is cabled to the receiver. The frequency range of the receiver must match up with the frequencies the transmitters are using.
Advanced receivers utilize digital signal processing techniques, or DSP. Special filters are used to digitally sample the input audio signal and digitize it, using algorithms to process the data. This helps filter out spurious signals in very noisy environments, such as in urban areas.
For larger projects, receiver-dataloggers are used. This allows you to easily save tracking data while in the field, or leave the receiver in unattended operation.
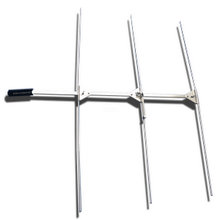
The Antenna
In a simple homing system, a single antenna is used. Multiple antennas may be used in more complex operations.
The antenna is connected to the a receiver using coaxial cable, usually type RG-58.
To maximize antenna gain and minimize signal loss, the shortest possible length of cable should be used.
Carry spare antenna cables while in the field. The weakest point in the system is the cable and its connectors; they receive continual stress when tracking in heavy brush.
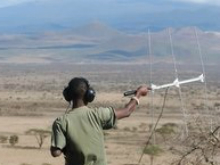
Basic Radio Telemetry (tracking or homing) Techniques
Complex triangulation methods may be used, but homing is the basic skill used in tracking. The objective is to visually locate the animal and record habitat and other biological data.
With your receiver turned on, antenna and cable connected, and if using, headphones on, first tune the receiver to the frequency for the transmitter you want to track. Set the receiver's volume to a comfortable level . Set the gain control (which controls the sensitivity of the receiver) to the full gain position.
Next, hold the antenna in the vertical plane, and now begin a slow sweeping motion of the antenna all around you, 360 degrees. Use the speaker, (or better, your headphones), to listen for your transmitters. As you track toward the animal, the gain should be reduced to the lowest level that allows you to hear the signal; adjust the receiver's gain control as required. Avoid changing the volume level if possible.
The ability to sense changes in signal volume (amplitude; the volume of the transmitter's beeps), is one to practice. Try closing your eyes as you sweep the antenna in a circle and try to listen for the changes in volume. Try to determine which direction the animal is located; as the volume of the beeping increases, you are getting closer. You'll continue to move closer to the animal while continuing to slowly sweep the antenna in smaller slices of a circle.
As the signal becomes stronger and directionality more difficult to discern, receiver gain can be reduced in order to decrease its sensitivity. If you need very low sensitivity, disconnect the receiver from the antenna, increase the gain, and then you can move back and forth in search of the transmitter. You’ll soon find your target.
Tips for Radio Tracking in the Field
- Have your receiver(s) bench-checked by ATS before tracking season begins, to avoid problems in the field.
- Don't skimp on spares; carry a spare receiver, antenna and cable, and field tool set.
- Make sure receiver batteries are fully charged before leaving for the field.
- Check and test the equipment as a complete system, using a reference transmitter to verify all of the components are operating correctly. Also, install and test software on your PC. Do this BEFORE going in the field!
Contact ATS if you need assistance. We can help you troubleshoot your system over the phone, even if you're in the field.